In this tutorial, we’ll explore how to implement OAuth 2.1 for MCP servers step by step. To keep things practical, we’ll build a simple finance sentiment analysis server and secure it using Scalekit, a tool that makes setting up OAuth both faster and easier.
With Scalekit, all we need to do is expose a metadata endpoint URL for MCP clients to discover the server and add authorization middleware for secure token-based authentication. Scalekit handles all the complex OAuth 2.1 flows behind the scenes, so you don’t need to manually implement or manage token generation, refresh, or validation. Once this setup is complete, your MCP server is ready to handle authenticated requests seamlessly. Check out the FULL CODES here.
Alpha Vantage API
To fetch stock news sentiment, we’ll use the Alpha Vantage API. To get a free API key:
- Visit the Alpha Vantage platform using this link
- Enter your email and the required details.
- You’ll receive your API key—copy it and store it securely, as you’ll need it to authenticate your requests.
Node JS
To run the MCP Inspector for testing our application, we need Node.js installed.
- Download the latest version of Node.js from nodejs.org
- Run the installer.
- Keep the default settings and complete the installation.
Python Dependencies
pip install fastapi fastmcp mcp scalekit-sdk-pythonScalekit
To start using Scalekit, follow these steps:
Create Your Scalekit Account
- Go to scalekit.com and sign up.
- Scalekit offers a free tier, so you don’t need to worry about billing.
- Once signed in, click “Activate Full-Stack Auth.”
Set Up Permissions
- Open the Authorization panel.
- Under the Permissions section, click “Add Permission.”
- Use the following values:
Permission Name: news:read
Description: Use Alpha Vantage to get Stock Sentiment
Permissions in Scalekit are used to define and manage scopes that control what features or resources your application can access. For example, the news:read permission allows your MCP server to access stock sentiment data from Alpha Vantage, while other permissions could be created to gate additional features or APIs within your application.
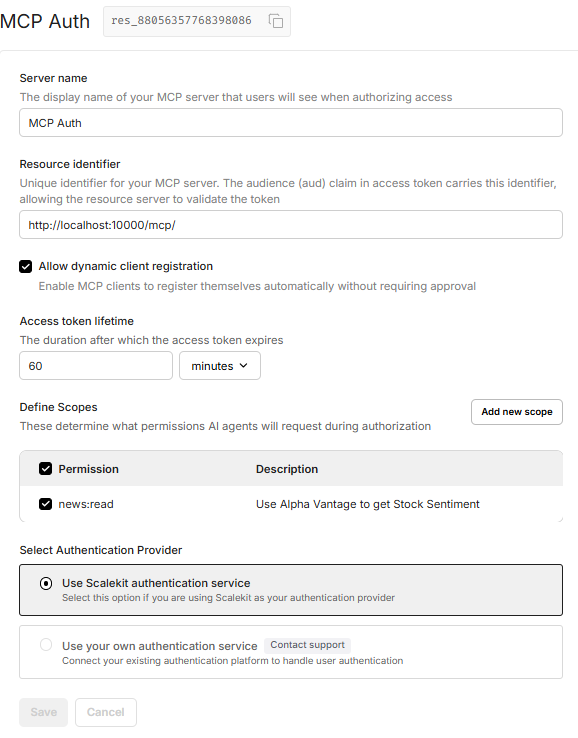
Add Your MCP Server
- Go to the MCP Servers section and click “Add MCP Server.”
- Fill in the required fields:
Server Name: Any name you prefer.
Resource Identifier: A unique identifier for your MCP server. This value is included in the aud claim of access tokens, helping the server validate requests.
For local testing, set it as:
http://localhost:10000/mcp/When using FastMCP, the /mcp path is automatically added to the endpoint. Make sure to include the trailing slash at the end to avoid configuration issues. Check out the FULL CODES here.
Set the scope to the permission you just created: news:read
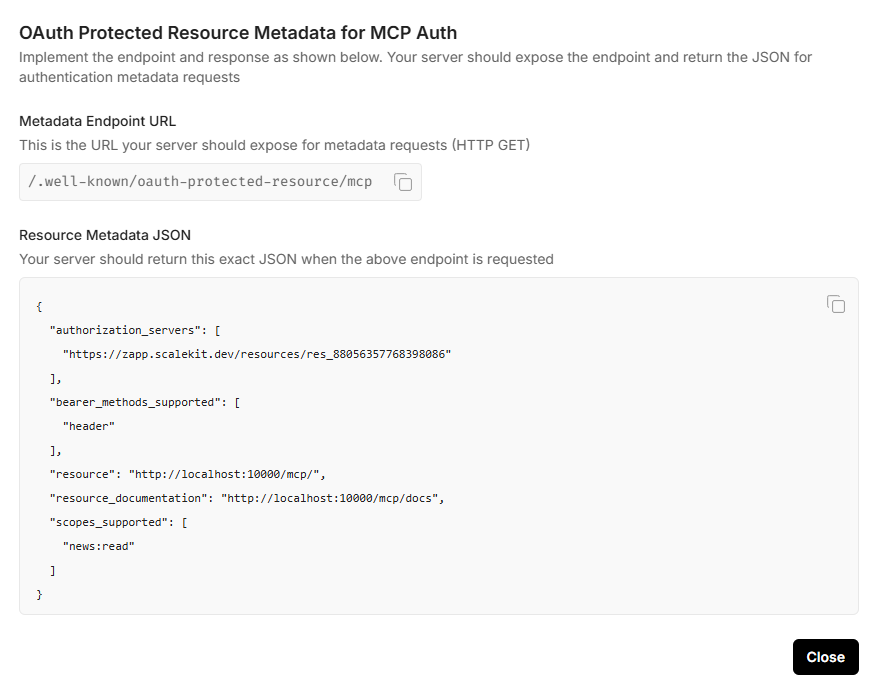
Once the server is created, Scalekit will generate your resource metadata. Be sure to note down the MCP Server Identifier (found next to the server name, e.g., res_88056357768398086), as you’ll need it later.
Resource Metadata Example
Your metadata will look similar to this (but unique for your account):
Metadata Endpoint URL:
/.well-known/oauth-protected-resource/mcpResource Metadata JSON:
{
  "authorization_servers": [
    "https://zapp.scalekit.dev/resources/res_88056357768398086"
  ],
  "bearer_methods_supported": ["header"],
  "resource": "http://localhost:10000/mcp/",
  "resource_documentation": "http://localhost:10000/mcp/docs",
  "scopes_supported": ["news:read"]
}
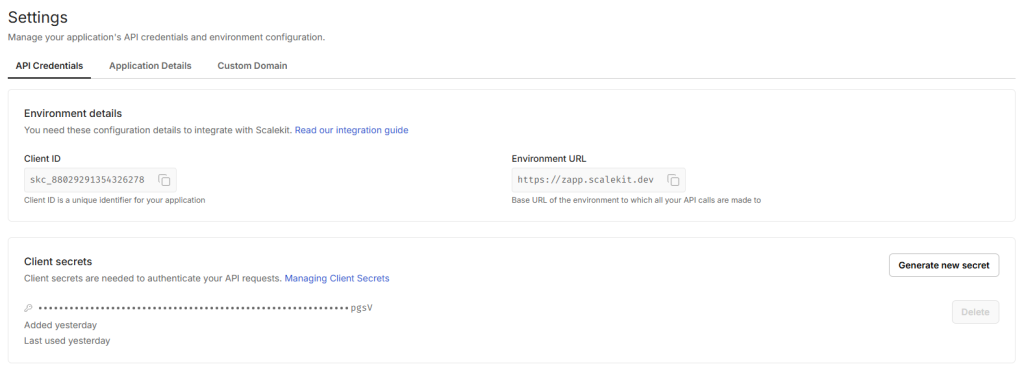
Get API Credentials
- Go to Settings → API Credentials.
- Copy your Client ID and Environment URL.
- Click Generate New Secret to create your Secret Key.
Store these values securely — we’ll need them later for configuration.
.env
We will now create a .env file with the following variables
ALPHA_VANTAGE_API_KEY=
METADATA_JSON_RESPONSE=

SCALEKIT_ENVIRONMENT_URL=
SCALEKIT_CLIENT_ID=
SCALEKIT_CLIENT_SECRET=
SCALEKIT_RESOURCE_METADATA_URL=
SCALEKIT_AUTHORIZATION_SERVERS=
SCALEKIT_AUDIENCE_NAME=
SCALEKIT_RESOUCE_NAME=
SCALEKIT_RESOUCE_DOCS_URL=
ALPHA_VANTAGE_API_KEY
Your personal API key from Alpha Vantage, used to fetch stock sentiment data.
METADATA_JSON_RESPONSE
The JSON response generated by Scalekit when you configure your MCP server.
It contains details like authorization servers, supported scopes, and documentation URLs.
SCALEKIT_ENVIRONMENT_URL
The environment URL under the Settings section.
SCALEKIT_CLIENT_ID
The client ID mentioned under the Settings section.
SCALEKIT_CLIENT_SECRET
The secret key you generate under Settings → API Credentials.
SCALEKIT_RESOURCE_METADATA_URL
The URL exposed by your MCP server for metadata requests.
Example:
http://localhost:10000/.well-known/oauth-protected-resource/mcpSCALEKIT_AUTHORIZATION_SERVERS
The URL pointing to the MCP Server Identifier issued by Scalekit.
Example:
https://.scalekit.dev/resources/res_*************** You can find the subdomain from the resource metadata JSON

SCALEKIT_AUDIENCE_NAME
The audience (aud) claim used in access tokens to validate requests. Check out the FULL CODES here.
http://localhost:10000/mcp/SCALEKIT_RESOUCE_NAME
The resource name for your MCP server. In most cases, this is the same as SCALEKIT_AUDIENCE_NAME. Check out the FULL CODES here.
SCALEKIT_RESOUCE_DOCS_URL
The URL where your MCP server’s documentation is hosted.
Example:
http://localhost:10000/mcp/docsWe will first create a config file to load all the environment variables which will be used later. Check out the FULL CODES here.
import os
from dotenv import load_dotenv

load_dotenv()

class Settings():
    ALPHA_VANTAGE_API_KEY = os.environ.get('ALPHA_VANTAGE_API_KEY')
    METADATA_JSON_RESPONSE = os.environ.get('METADATA_JSON_RESPONSE')
    SCALEKIT_ENVIRONMENT_URL = os.environ.get('SCALEKIT_ENVIRONMENT_URL')
    SCALEKIT_CLIENT_ID = os.environ.get('SCALEKIT_CLIENT_ID')
    SCALEKIT_CLIENT_SECRET = os.environ.get('SCALEKIT_CLIENT_SECRET')
    SCALEKIT_RESOURCE_METADATA_URL = os.environ.get('SCALEKIT_RESOURCE_METADATA_URL')
    SCALEKIT_AUTHORIZATION_SERVERS = os.environ.get('SCALEKIT_AUTHORIZATION_SERVERS')
    SCALEKIT_AUDIENCE_NAME = os.environ.get('SCALEKIT_AUDIENCE_NAME')
    SCALEKIT_RESOUCE_NAME = os.environ.get('SCALEKIT_RESOUCE_NAME')
    SCALEKIT_RESOUCE_DOCS_URL = os.environ.get('SCALEKIT_RESOUCE_DOCS_URL')
    PORT = 10000


settings = Settings()
This code block fetches real-time news sentiment data for a given stock ticker using the Alpha Vantage API. It retrieves the top three recent articles, summarizing their title, summary, source, and publication time for quick insights. Check out the FULL CODES here.
from mcp.server.fastmcp import FastMCP
from typing import Any
import os
import httpx
from typing import Dict, List
from config import settings

# Create an MCP server
mcp = FastMCP("finance-news")

BASE_URL = "https://www.alphavantage.co/query"

async def call_alpha_vantage(endpoint: str, params: dict[str, Any]) -> dict[str, Any] | None:
    """Generic async caller to Alpha Vantage."""
    params["apikey"] = settings.ALPHA_VANTAGE_API_KEY
    params["function"] = endpoint
    async with httpx.AsyncClient() as client:
        try:
            response = await client.get(BASE_URL, params=params, timeout=30.0)
            response.raise_for_status()
            return response.json()
        except Exception:
            return None

@mcp.tool()
async def get_news_sentiment(ticker: str) -> str:
    """Get news sentiment data for a stock ticker.

    Args:
        ticker: Stock ticker symbol (e.g., MSFT, AAPL)
    """
    data = await call_alpha_vantage("NEWS_SENTIMENT", {"tickers": ticker.upper()})
    if not data or "feed" not in data:
        return "Couldn't retrieve news sentiment."

    articles = data["feed"][:3]
    result = []
    for item in articles:
        result.append(f"""
     {item['title']}
    Summary: {item['summary']}
    Source: {item['source']} | Published: {item['time_published']}
    """)
    return "n---n".join(result)
This middleware acts as an authorization layer for your MCP server, ensuring that only authenticated requests are processed. It uses the ScaleKit client to validate access tokens on every incoming request. When a request comes in, the middleware first checks if the path is public, such as metadata endpoints under /.well-known/.
If the request isn’t for a public path, it looks for an Authorization header with a valid Bearer token. The token is then validated using ScaleKit. If the token is missing, invalid, or expired, the middleware immediately responds with a 401 Unauthorized error and a structured error message. Check out the FULL CODES here.
If the token is valid, the request is passed along to the next layer of the application. Additionally, logging is integrated throughout the process to capture key events, making it easier to debug and audit authentication flows.
Finally, this middleware will be imported and added to the server file to protect all secure endpoints. Check out the FULL CODES here.
import json
import logging
from fastapi import HTTPException, Request
from fastapi.security import HTTPBearer
from fastapi.responses import JSONResponse
from scalekit import ScalekitClient
from starlette.middleware.base import BaseHTTPMiddleware

from config import settings

# Configure logging
logging.basicConfig(
    level=logging.INFO,
    format="%(asctime)s - %(name)s - %(levelname)s - %(message)s"
)
logger = logging.getLogger(__name__)

# Security scheme for Bearer token
security = HTTPBearer()

# Initialize ScaleKit client
scalekit_client = ScalekitClient(
    settings.SCALEKIT_ENVIRONMENT_URL,
    settings.SCALEKIT_CLIENT_ID,
    settings.SCALEKIT_CLIENT_SECRET
)

# Authentication middleware
class AuthMiddleware(BaseHTTPMiddleware):
    async def dispatch(self, request: Request, call_next):
        if request.url.path.startswith("/.well-known/"):
            return await call_next(request)

        try:
            auth_header = request.headers.get("Authorization")
            if not auth_header or not auth_header.startswith("Bearer "):
                raise HTTPException(status_code=401, detail="Missing or invalid authorization header")

            token = auth_header.split(" ")[1]

            request_body = await request.body()

            # Parse JSON from bytes
            try:
                request_data = json.loads(request_body.decode('utf-8'))
            except (json.JSONDecodeError, UnicodeDecodeError):
                request_data = {}

            try:
                scalekit_client.validate_access_token(token)

            except Exception as e:
                raise HTTPException(status_code=401, detail="Token validation failed")

        except HTTPException as e:
            return JSONResponse(
                status_code=e.status_code,
                content={"error": "unauthorized" if e.status_code == 401 else "forbidden", "error_description": e.detail},
                headers={
                    "WWW-Authenticate": f'Bearer realm="OAuth", resource_metadata="{settings.SCALEKIT_RESOURCE_METADATA_URL}"'
                }
            )

        return await call_next(request)
This script sets up a FastAPI application integrated with an MCP server for stock news sentiment analysis. It begins by importing the necessary libraries, including FastAPI, CORS middleware, and a custom authentication middleware. Check out the FULL CODES here.
The application lifecycle is managed through a combined lifespan context using an asynchronous context manager, ensuring that the finance_news_server.session_manager, which is essentially the stock sentiment logic we created, runs smoothly during the app’s runtime. CORS middleware is configured to allow cross-origin requests, which is useful during development but should be restricted in production environments.
A new endpoint, /.well-known/oauth-protected-resource/mcp, is added to serve metadata for OAuth 2.1 protected resource discovery. This endpoint provides important details such as supported authorization servers, bearer token methods, resource name, documentation URL, and supported scopes — in this case, mcp:tools:news:read.
The MCP server is created using the finance_news_server.streamable_http_app() function and mounted at the root path /, making the core MCP functionalities accessible through the main app. Authentication is enforced by integrating the AuthMiddleware, and the script ensures that this middleware is properly added to the server file.
Finally, the main() function runs the application using uvicorn, with logging enabled at the debug level, binding the server to localhost on the configured port. Check out the FULL CODES here.
import contextlib
import uvicorn
from fastapi import FastAPI
from fastapi.middleware.cors import CORSMiddleware
import json
from auth import AuthMiddleware
from config import settings
from finance import mcp as finance_news_server

# Create a combined lifespan to manage the MCP session manager
@contextlib.asynccontextmanager
async def lifespan(app: FastAPI):
    async with finance_news_server.session_manager.run():
        yield

app = FastAPI(lifespan=lifespan)

# Add CORS middleware
app.add_middleware(
    CORSMiddleware,
    allow_origins=["*"],  # In production, specify your actual origins
    allow_credentials=True,
    allow_methods=["GET", "POST", "PUT", "DELETE", "OPTIONS"],
    allow_headers=["*"],
)

# MCP well-known endpoint
@app.get("/.well-known/oauth-protected-resource/mcp")
async def oauth_protected_resource_metadata():
    """
    OAuth 2.0 Protected Resource Metadata endpoint for MCP client discovery.
    Required by the MCP specification for authorization server discovery.
    """

    return {
        "authorization_servers": [settings.SCALEKIT_AUTHORIZATION_SERVERS],
        "bearer_methods_supported": ["header"],
        "resource": settings.SCALEKIT_RESOURCE_NAME,
        "resource_documentation": settings.SCALEKIT_RESOURCE_DOCS_URL,
        "scopes_supported": [
          "mcp:tools:news:read"
        ],
    }

# Create and mount the MCP server with authentication
mcp_server = finance_news_server.streamable_http_app()
app.add_middleware(AuthMiddleware)
app.mount("/", mcp_server)

def main():
    """Main entry point for the MCP server."""
    uvicorn.run(app, host="localhost", port=settings.PORT, log_level="debug")

if __name__ == "__main__":
    main()
To run the server, execute python server.py, which will start the application on localhost:10000. To test the setup, open another terminal and run:
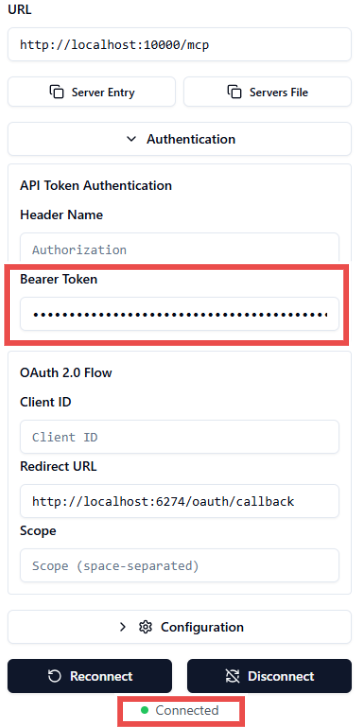
npx @modelcontextprotocol/inspectorOnce the MCP Inspector is running, enter http://localhost:10000/mcp as the server URL. If you attempt to connect without providing valid credentials, you will encounter the following error:
Connection Error: Check if your MCP Server is running and if the proxy token is correctly configured.
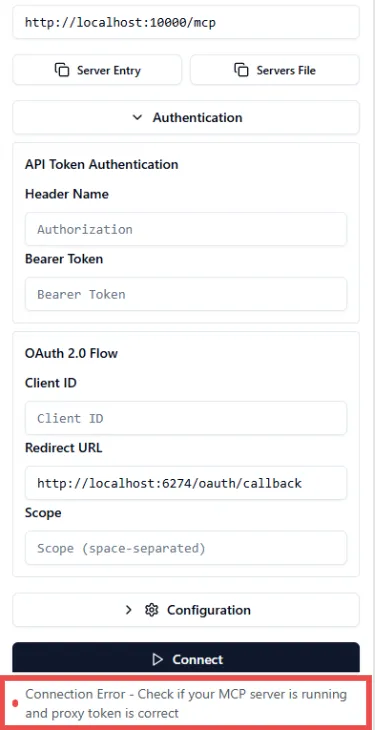
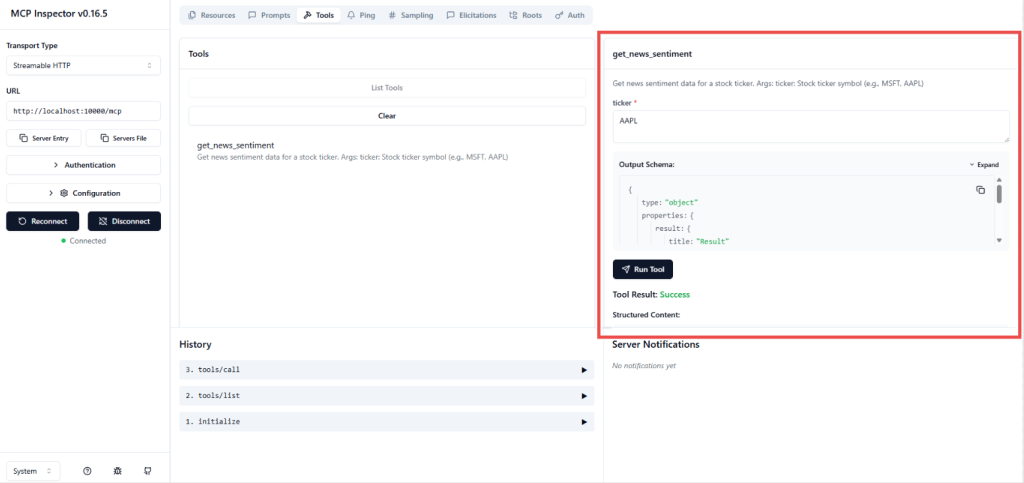
Now, provide the Bearer token using the secret ID you generated in Scalekit. Once entered, you will be successfully authenticated and can start making tool calls.
Check out the FULL CODES here. Feel free to check out our GitHub Page for Tutorials, Codes and Notebooks. Also, feel free to follow us on Twitter and don’t forget to join our 100k+ ML SubReddit and Subscribe to our Newsletter.

I am a Civil Engineering Graduate (2022) from Jamia Millia Islamia, New Delhi, and I have a keen interest in Data Science, especially Neural Networks and their application in various areas.